| Manufacturer: Various | ||
| Apple Drives in Apple Brackets and PC Faceplates | ||
 |
||
| This is the Apple IIgs Portable, from this view you can see it is using a Mac SE/II/Classic type floppy mounting bracket. | ||
 |
This drive is only held in by the two side screws. It stays put very nicly. I just used screws that were a little longer on the one side and put them right through to the drive. The top of the bracket sits on top of the inner edge of the front bezel giving it support accross the top. This is somewhat visible in this example. | |
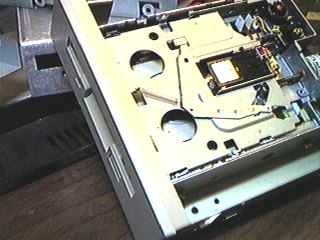
 |
In this top view of the Apple IIgs Portable you can see the drive bracket hovering over the motherboard. The area between the monitor and floppy drive holds a 3.5" SCSI drive mounted verticaly on a drop in bracket. The SCSI cable is seen and the floppy cable running to the back. | |
 |
In this case I used an IBM PS/2 Faceplate. It is attached by the two little black screws just below the lip. For the eject switch, a mouse button was used, glued into the hole where the eject pushbutton was. The LED was glued behind the faceplate as well. Not shown, but if you look closely at your Apple drive assembly you will see two tabs on the front of the drive. | |
| These tabs are extensions of the side of the drive, bent around the front to 'corner' the printed circut board from being damaged. I drilled very small holes in these tabs by bending them out parallel to the side of the drive, drilling the hole and then bending it back. You can ONLY BEND THIS ONCE. So get it right the first time or it will most likly break off the second time you bend it. | ||
 |
In this picture is the floppy drive in my Macintosh 8100. (As you can see this 8100 is not in a normal case either. I have 6 full size drive bays in the front of this rather large HP Vectra tower case. At the time I did this I did not have a full faced PC drive backet, this is what you will usually find. This type of adapter uses the 3.5" drives faceplate in the center to fill the hole. | |
| You may have to resort to the $3.00 used/bad drive and glue a faceplate into the opening if this is all you can find. I do think that if you have a choice. It is better to mount the Apple drive in the 5.25" drive bay if you have an extra one. This gives you plenty of room for the cabling and daisy chain board in the back if you are not going to extend the 20 pin ribbon cable on the daisy chain board to mount it on the backplane for addtional access to the drive port. | ||